You finished the screen recording. It is on your disk, it is five minutes long, and the three moments that matter are buried at 0:40, 2:12, and 4:03. Normally this is where you leave the terminal behind: open a timeline editor, drag clips around, hunt for zoom buttons, export, repeat.
Claude Code can now handle that edit with you. Connect Poindeo MCP — a local video-editing server that plugs into Claude Code — and the same agent that reads your code can read your footage, add zooms and camera moves where the action happens, check its own work by capturing rendered frames, and write the finished MP4 back to your disk. This guide covers installation, a complete first edit, and the prompts that reliably work.
Key Takeaways
- Two commands to install: Poindeo MCP installs into Claude Code as a plugin from a marketplace — no config file surgery, and updates arrive automatically.
- Real edits, not one-shot filters: the agent drives a visual editor through 60 undoable operations — zoom points, camera moves, transitions, subtitles, mosaics, music — instead of chaining FFmpeg flags.
- It checks its own work: frame capture returns the actual rendered frame into your terminal session, so zoom framing gets verified, not assumed.
- Your media stays local: the server runs on your machine and talks to the editor over stdio; exports are written straight to your disk.
- Free to try: the MCP server is free, and a free Poindeo project covers 2 scenes with 720P export (watermarked) — no account needed for a first run.
What a Video MCP Server Actually Does
The Model Context Protocol is the open standard that lets Claude Code call external tools — the same mechanism behind the MCP servers in Claude Code's own docs. A video editing MCP server exposes editing as those tools: instead of pasting a transcript or querying a database, the agent reads a timeline and applies edits.
Poindeo MCP is the one wired into a real visual editor. The server runs locally on your machine and connects Claude Code to the Poindeo browser editor: the agent reads the current project, imports your media, applies edits through the same command layer as your own clicks, captures frames to verify the result, and exports the finished video to disk. Because the editor runs in your browser and the server runs on your machine, your footage never gets uploaded anywhere.
What You Need Before You Start
- Claude Code, installed and working in your terminal.
- A local Node.js — the plugin launches through it. If you do not have it, grab it from nodejs.org.
- Chrome or Edge — the editor opens in your default browser on first use, and Chromium browsers give the full feature set.
- A Poindeo account (optional) — you can try without one. Free projects support 2 scenes and 720P export with a watermark; logging in and subscribing unlocks 1080P up to 4K.
How to Install the Poindeo MCP Plugin in Claude Code
Claude Code installs Poindeo MCP as a plugin from a plugin marketplace — the same two-command pattern you use for any marketplace plugin, no manual JSON editing.
- Add the marketplace. In your terminal, run: claude plugin marketplace add poindeo/poindeo-plugins
- Install the plugin. Then run: claude plugin install poindeo-mcp@poindeo-plugins — updates follow the marketplace automatically, so there is no upgrade command to remember.
- Start a fresh session. Plugins load when a session starts, so an already-open chat will not see the new tools. Quit and relaunch Claude Code, or just start a new conversation.
- Verify the connection. Ask one question: What can you do with Poindeo? If the answer lists concrete abilities — read the project, add zooms, add subtitles, export an MP4 — you are connected. Running /mcp shows the connection status if you prefer the system view.
- Make the first tool call, and let the tab open. The first call launches the Poindeo editor in your default browser. If nothing appears, a popup blocker probably swallowed the tab — allow popups for the site and ask again.
A reply like "no Poindeo tools found" means you are not connected yet: start a fresh chat first, then fully restart the CLI if the tools still do not appear.
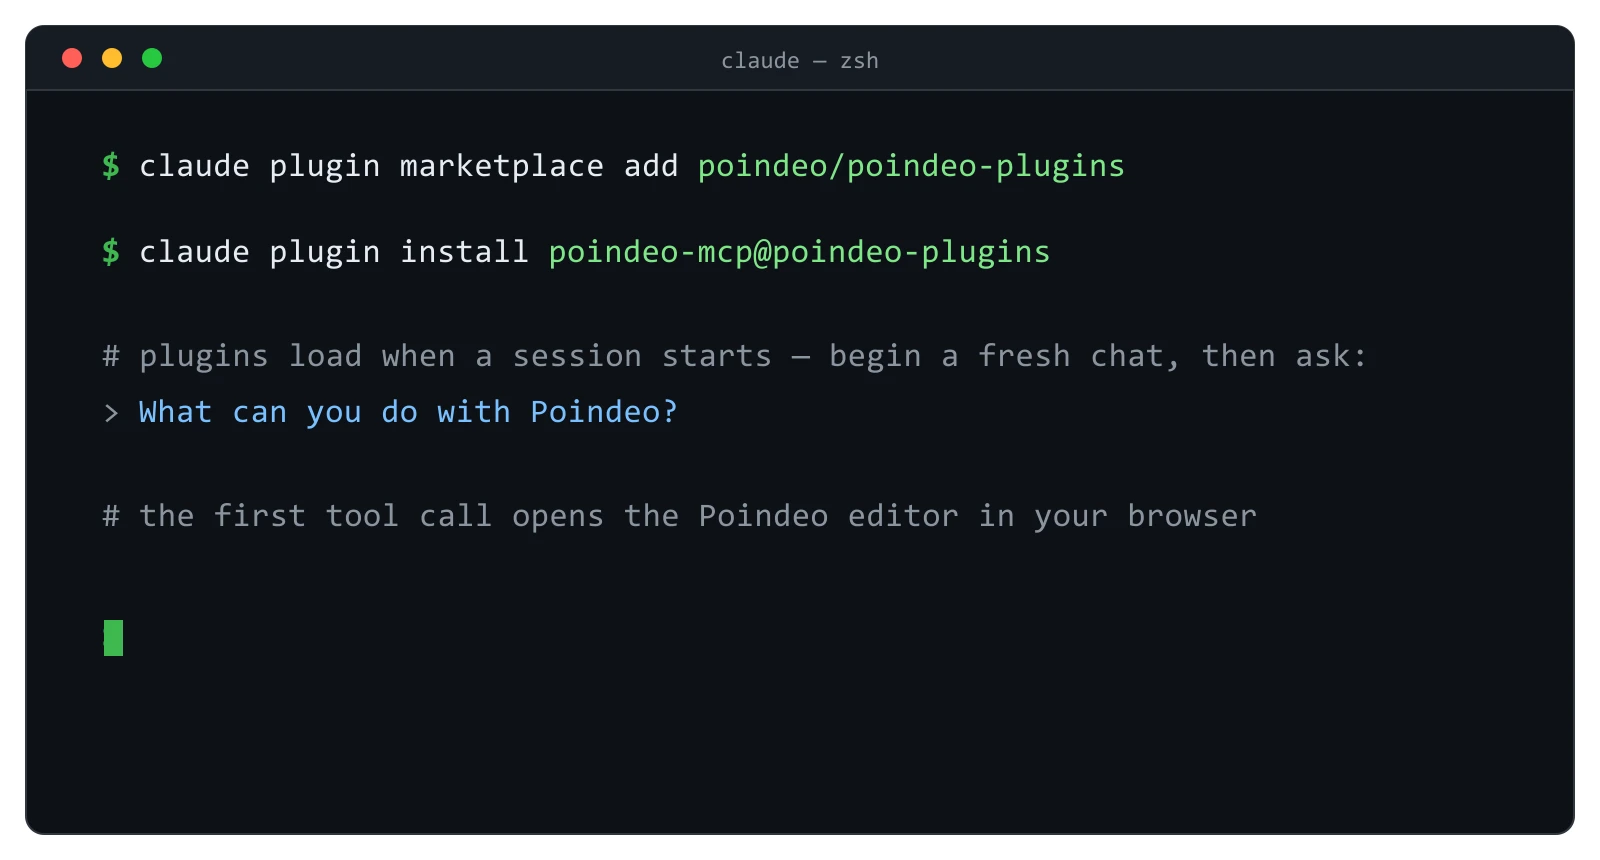
The whole setup: add the marketplace, install the plugin, start a fresh session.
Windows note: after installing Node.js fresh, restart your terminal (and Claude Code) so PATH picks it up — a "command not found" right after a successful install is almost always this.
Your First Edit: From Raw Recording to Exported MP4
Here is the full loop, the way it plays out in one Claude Code session. Every quoted prompt below is something you can paste as-is.
- Point the agent at your files. Local media goes in by absolute path — video, images, GIFs, or PDF all work: Import the screen recording at C:/Users/you/Downloads/demo.mp4 and tell me what scenes it has. The first import opens the editor tab; from here on, editing, frame capture, and export all work with that tab in the background.
- Let it read the project before editing. Ask what is in the project right now and the agent inventories the scenes, durations, and existing points. It feels like small talk; it matters — every edit that follows references real scene and point IDs instead of guesses.
- Ask for zooms where the action happens. Timestamp, zoom level (up to 5x), and easing are all yours to specify: Add a zoom point to the pricing table at 12 seconds in the first scene: zoom 2x, ease in and out, hold for 2 seconds. Not right? Zoom points can be moved, retimed, and re-leveled until the pacing feels right — they are editor objects, not burned-in renders.
- Make it prove the framing. This is the step that separates a real editing agent from a batch script: Capture a frame at the zoom peak so I can check the framing. The rendered frame comes back into the conversation — even in a terminal-only session. If the pricing table is clipped or off-center, say so; the agent adjusts the point and captures again.
- Add the finishing passes. Subtitles, privacy masks, and audio in the same thread: Add a mosaic over the email address in scene 2 from 3s to 9s, generate subtitles for the whole project, and add soft background music at low volume. That single sentence exercises three of the roughly 60 operations the server exposes — trim, split, transitions, labels, camera overlays, and per-scene speed are all in the same toolbox.
- Export, with a confirmation step. Ask for the export and the agent states its plan first — format and resolution — then waits for your go-ahead. Confirm, and the MP4 is written straight to your Downloads folder. No manual download dance, no upload round-trip.
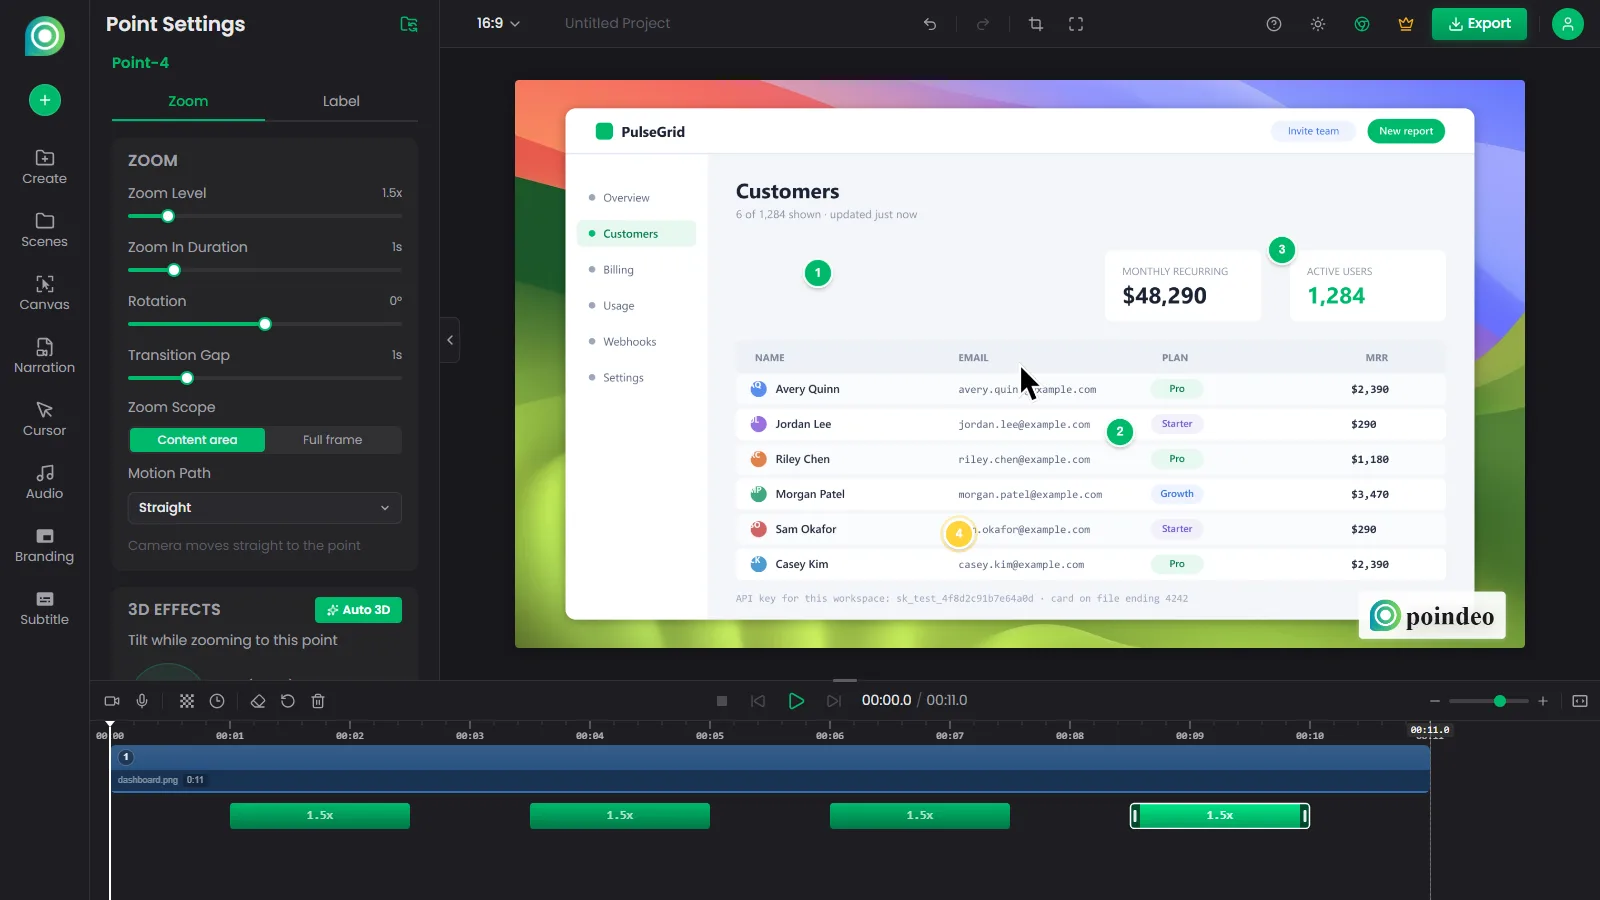
Zoom points in the editor: each marker is draggable, and every agent edit lands here as a normal, undoable step.
That loop — ask, look, adjust — is where editing with an agent starts feeling like editing with an editor. A real exchange tends to run: you ask for a 2x zoom on the pricing table, the captured frame shows the table's right column cut off, you say "back it off to 1.6x and nudge left", and the next capture is framed the way you meant. Two rounds is typical for a precise shot; one is common once you learn what a zoom level looks like before asking.
Pro tip: before editing a long recording, ask for a contact sheet: sample 12 frames from the screen-recording scene, pick the moments where the cursor clicks, and add a zoom point to each. The agent plans the edit from actual frames instead of guessing at timestamps.
The Step Most Video Tools Skip: Verifying the Frame
Most video MCP servers in the wild are FFmpeg wrappers: the agent composes a command, runs it, and gets an exit code back. It edits blind. If the crop is off or the text is unreadable at that zoom level, nothing in the loop notices — you find out after watching the export.
Poindeo MCP closes that loop. A single-frame capture returns the actual rendered frame at full resolution — zoom point, subtitle, mosaic and all — straight into the agent's context. For planning, a frame sample lays up to 60 labeled frames into one contact sheet, which is how the agent finds the clicks worth zooming into.
| FFmpeg-wrapper MCP servers | Poindeo MCP | |
| How edits happen | Command-line filters, run once | Editor commands, undoable, iterative |
| Verification | Exit codes and logs | Actual rendered frames in the conversation |
| Iteration | Re-run with new parameters | Move and retime points, re-capture until right |
| Preview | None — trust the command | The editor tab shows every state |
| Best for | Batch pipelines, codec-level jobs | Visual edits where framing matters |
To be fair to the FFmpeg column: for unattended batch transcodes and codec-level surgery, a CLI wrapper is still the right tool. Poindeo MCP is for the edits where what the frame looks like is the whole point — demos, tutorials, launch videos.
Beyond Zoom: What Else You Can Ask For
The editor UI ships fixed presets; an agent is not limited to them. It composes the underlying primitives — camera paths, 3D tilt and rotation, transitions, overlays — into moves no preset covers, from a single sentence.
| Capability | Example ask | Best for |
| Camera moves | Give the intro scene a slow 5-second push-in with a subtle 3-degree tilt, then glide into the walkthrough scene | Intros that feel produced instead of static |
| Auto-zoom | Re-plan the auto-zoom points on my extension recording with fewer, longer zooms, and show me the plan first | Turning one long take into a guided demo |
| Subtitles | Generate subtitles for the whole project | Tutorials and muted-autoplay contexts |
| Mosaics and watermarks | Mosaic over the email address in scene 2 from 3s to 9s | Screenshots with sensitive information |
| Labels and overlays | Add a short label at each zoom point naming what changed | Changelogs and feature walkthroughs |
| Audio | Add soft background music at low volume | Watch-through without voice-over |
| Structure | Trim the dead air at the start, split scene 3, and slow the final scene to half speed | Cutting to the parts that matter |
Auto-zoom deserves a note: recordings made with the Poindeo extension carry cursor trajectories, so zoom points can follow the clicks precisely, at any density the agent re-plans. For plain videos with no tracking data, a vision mode applies the agent's own frame-by-frame analysis instead. If you want the manual version of that workflow, we cover it in How to Add Auto Zoom to Screen Recordings.
How It Behaves: Tabs, Recording, and Undo
A few behaviors are worth knowing before you build a workflow on this.
- The tab can stay in the background. Editing, frame capture, and export rendering all run offscreen at full canvas resolution. Only two things want the tab visible: live playback preview, and video imports while the file loads.
- Recording stays manual — by design. Screen, camera, and microphone capture is gated by browser permission dialogs, so only you can start a recording. The agent opens the right panel and takes over the moment you stop: importing, auto-zoom, editing, and export are all automated from there.
- Everything is undoable. Agent edits go through the same command layer as your own clicks, so Ctrl+Z in the editor reverts them — and every operation is validated on both ends before it runs.
- Telemetry is anonymous and optional. The server reports version numbers and error summaries — never media or project content — and one environment variable disables it entirely: POINDEO_MCP_NO_TELEMETRY=1.
- Free-tier boundaries. Without an account: 2 scenes per project, 720P export, watermark. The agent tells you when logging in would unlock more.
What to Build First
Three starter projects that exercise different corners of the toolbox:
- A README demo GIF. Import screenshots, add a zoom point to each region that matters, export — we walk through the exact recipe in How to Make a Product Demo GIF for Your README.
- A launch-day product demo. The PNGs in your screenshots folder become scenes with slow push-ins and a labeled zoom on the pricing table — one thread from raw assets to an MP4 you can ship.
- A tutorial with subtitles. Record in the editor, then let the agent generate subtitles, mosaic the account email that wandered into frame, and export.
FAQs About Editing Video With Claude Code
Does the Poindeo MCP server cost anything?
The server itself is free. The editor's free plan covers 2 scenes per project and 720P export with a watermark; paid plans start at $19.99/month for 1080P to 4K without the watermark, with a $99 lifetime option.
Is my footage uploaded anywhere?
No. The MCP server runs locally and connects to the editor in your own browser; media and exports stay on your machine. The only outbound traffic is anonymous telemetry (version numbers and error summaries), which the POINDEO_MCP_NO_TELEMETRY=1 environment variable disables.
Can Claude Code record my screen for me?
No — and that is deliberate. Browser permission dialogs mean only you can grant screen, camera, or microphone access. The agent opens the correct recording panel and handles everything after you stop.
Do I have to keep the browser tab visible?
No, not for most of the workflow. Editing, frame capture, and exports all work with the tab backgrounded. Keep it visible for live playback preview, and when a video import is loading.
What kinds of files can the agent import?
Video files, images, GIFs, and PDFs — anything you would feed the editor by hand. Pass local files by absolute path (the two example prompts in this guide show the shape). PDFs come in as pages, so a deck can become a scene sequence without any conversion step on your side.
Does it work with Codex or Cursor too?
Yes — the same server runs on any client that supports local stdio MCP servers. Codex and Cursor launch it via npx (Node 22.18+), while Claude Code installs it as the plugin this guide covers. Short guides for both are live: the Codex setup and the Cursor setup.
What if the agent's edit comes out wrong?
Press Ctrl+Z in the editor to revert — agent edits are normal history entries. Or just tell the agent what is off; it adjusts the point or overlay and re-captures the frame so you can confirm the fix.
From Terminal to Finished Video
Video editing was the last place a terminal-native workflow could not reach: the footage lived on your disk, but the decisions lived in a GUI. An MCP server closes that gap without giving up the GUI — the editor still renders every frame, your agent does the driving, and you stay where the work started.
Run the two install commands, start a fresh session, and ask what it can do. When the editor tab opens, you are one prompt away from a finished cut.