
Your README has about three seconds to prove your project does something real. A wall of installation instructions cannot do that in three seconds. A looping GIF of the product actually working can — it autoplays everywhere, needs no click, and keeps running while the visitor scans the rest of the page.
A demo GIF is also the cheapest distribution asset you will ever ship: it travels with every fork, every clone, and every package page that re-renders your README. This guide covers the specs worth aiming for, a five-step workflow, and the export settings that keep small UI text readable when the whole demo is only 480 pixels wide.
Key Takeaways
- Aim for 5–15 seconds, 480–800 px wide, 10–15 fps, and a file under 5 MB.
- GitHub warns about files over 50 MB and rejects anything over 100 MB, so a disciplined GIF never comes close to the limit.
- The single biggest quality lever is zooming: a full-screen capture scaled down to README width is illegible, so add zoom points on the regions you are actually showing.
- GIF export is free in Poindeo (the free plan adds a small watermark); ScreenToGif, Kap, LICEcap, GIPHY Capture, and vhs are solid alternatives depending on your platform.
Why a GIF Still Belongs in a README
GitHub now renders MP4 attachments in issues, pull requests, and READMEs — you drag the file into an issue draft, then paste the resulting URL. So why do maintainers still ship GIFs?
Because a GIF is the only format that behaves identically everywhere your README is rendered. It autoplays and loops on github.com, on npm and PyPI package pages, in mirrors and archives — no click, no player chrome, no sanitizer stripping the tag. An MP4 attachment plays inline after a click on github.com, does not loop, is tied to your account rather than the repository, and is routinely stripped by registries that re-render READMEs.
The trade-offs are real: the GIF format has no audio track and a 256-color palette. That makes it perfect for short, silent UI demos and wrong for narrated walkthroughs — link a full video next to it if you need voice.
On size: GitHub warns when a file exceeds 50 MB and blocks the push outright at 100 MB, and repositories are expected to stay well under 1 GB. A demo GIF done right lands at 1–5 MB, so the limit is never in play.
The Specs to Aim For
| Setting | Target | Why it matters |
| Width | 600–800 px | README content columns are roughly 800 px; export at 800 px so small text stays sharp, and let the zoom carry the detail |
| Duration | 5–15 seconds | One task per loop — longer loops get skipped |
| Frame rate | 10–15 fps | Smooth enough for pans without bloating the file |
| File size | Under 5 MB | Instant render, fast clones, far under GitHub limits |
Step 1 — Capture a Tight Demo
Record only the core task. Write it as three beats — show the starting screen, perform one action, show the result — and cut everything else. A 6-second loop that demonstrates one thing beats a 40-second tour nobody finishes. If you need a refresher on capturing the footage, our guide to creating a demo video with auto zoom covers recording, framing, and pacing.
Before you record, close personal tabs, hide notification popups, and blur anything sensitive such as account emails or API keys — here is a full walkthrough of blurring regions in a screen recording.
The workflow below uses Poindeo, a browser-based video editor with built-in zoom animation and GIF export, because it turns the raw capture into a finished GIF without installing anything. The same steps apply in any tool from the list at the end.
Step 2 — Add Zoom Points So Details Stay Legible
This is the step most README GIFs skip, and it is why most of them are unreadable. A 1920 × 1080 screen capture displayed at 480 px wide is scaled to 25 percent: 16-pixel UI text becomes 4 pixels tall. No export setting fixes that — the camera has to get closer to the content.
In the editor, import your recording or screenshots, then click directly on the canvas wherever the action happens. Each click drops a zoom point: the camera glides in, holds on that region for about a second and a half, then glides out or moves to the next point. Two to four points are enough for a 6–15 second demo.
Because the zoom is baked into the camera path, the exported GIF inherits it — every frame is rendered at full source resolution and scaled down only at the end, so zoomed-in frames stay sharp.
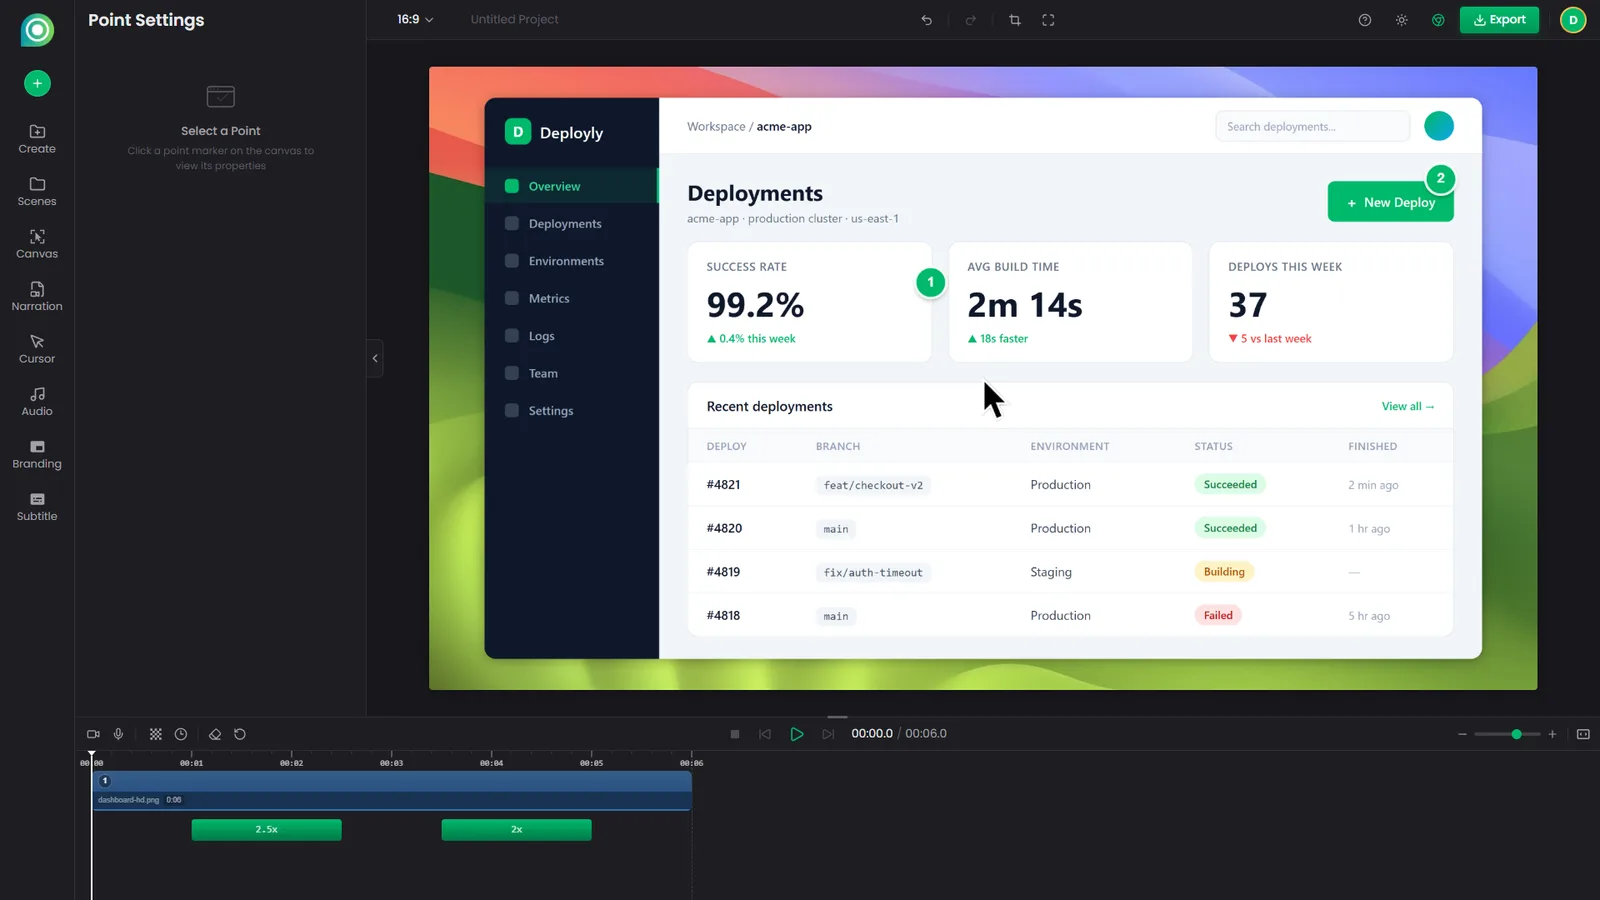
Click anywhere on the canvas to add a zoom point; drag a point to retarget the region it enlarges.
Step 3 — Export as a GIF
Open the export panel and switch to the GIF tab. Three settings do the work:
- Resolution. 800 px matches the README content column and keeps small UI text sharp; drop to 480–640 px only when the file-size budget is tight.
- Frame rate. 10 fps keeps motion readable at a modest file size; step up to 12–15 fps for fast cursor movement.
- Quality. The High tier is the sweet spot — Ultra inflates the file for a difference you will not see at this size.
GIF export is not paywalled: the free plan renders the full pipeline — zoom points, captions, cursor, transitions — into the GIF, with a small watermark in the corner. Paid plans remove the watermark and raise video-export resolution.
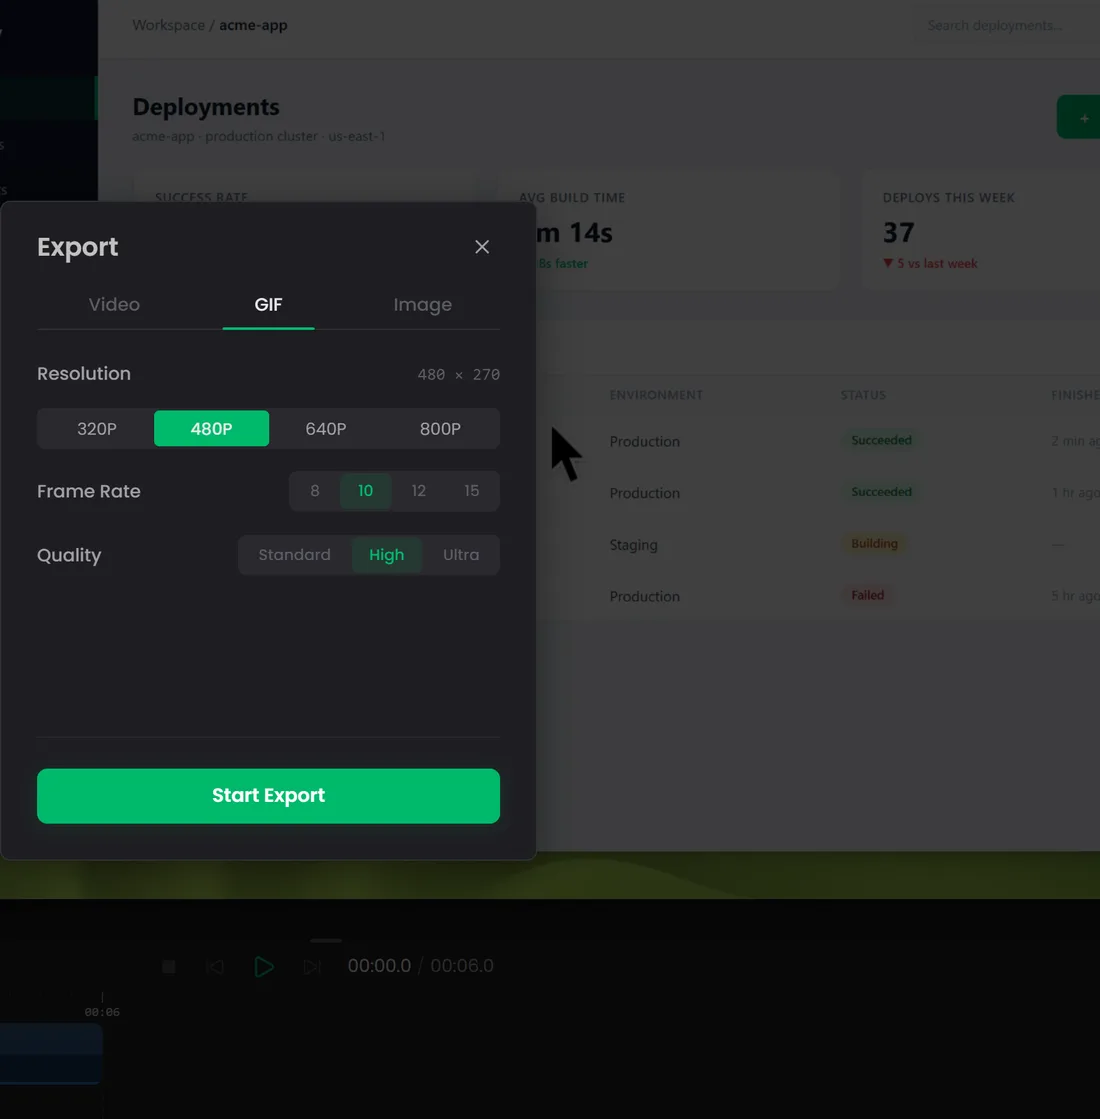
The GIF export panel: resolution, frame rate, and quality in one place.
The GIF below comes from a two-zoom-point project: about six and a half seconds, 800 px wide, 12 fps, 1.8 MB.
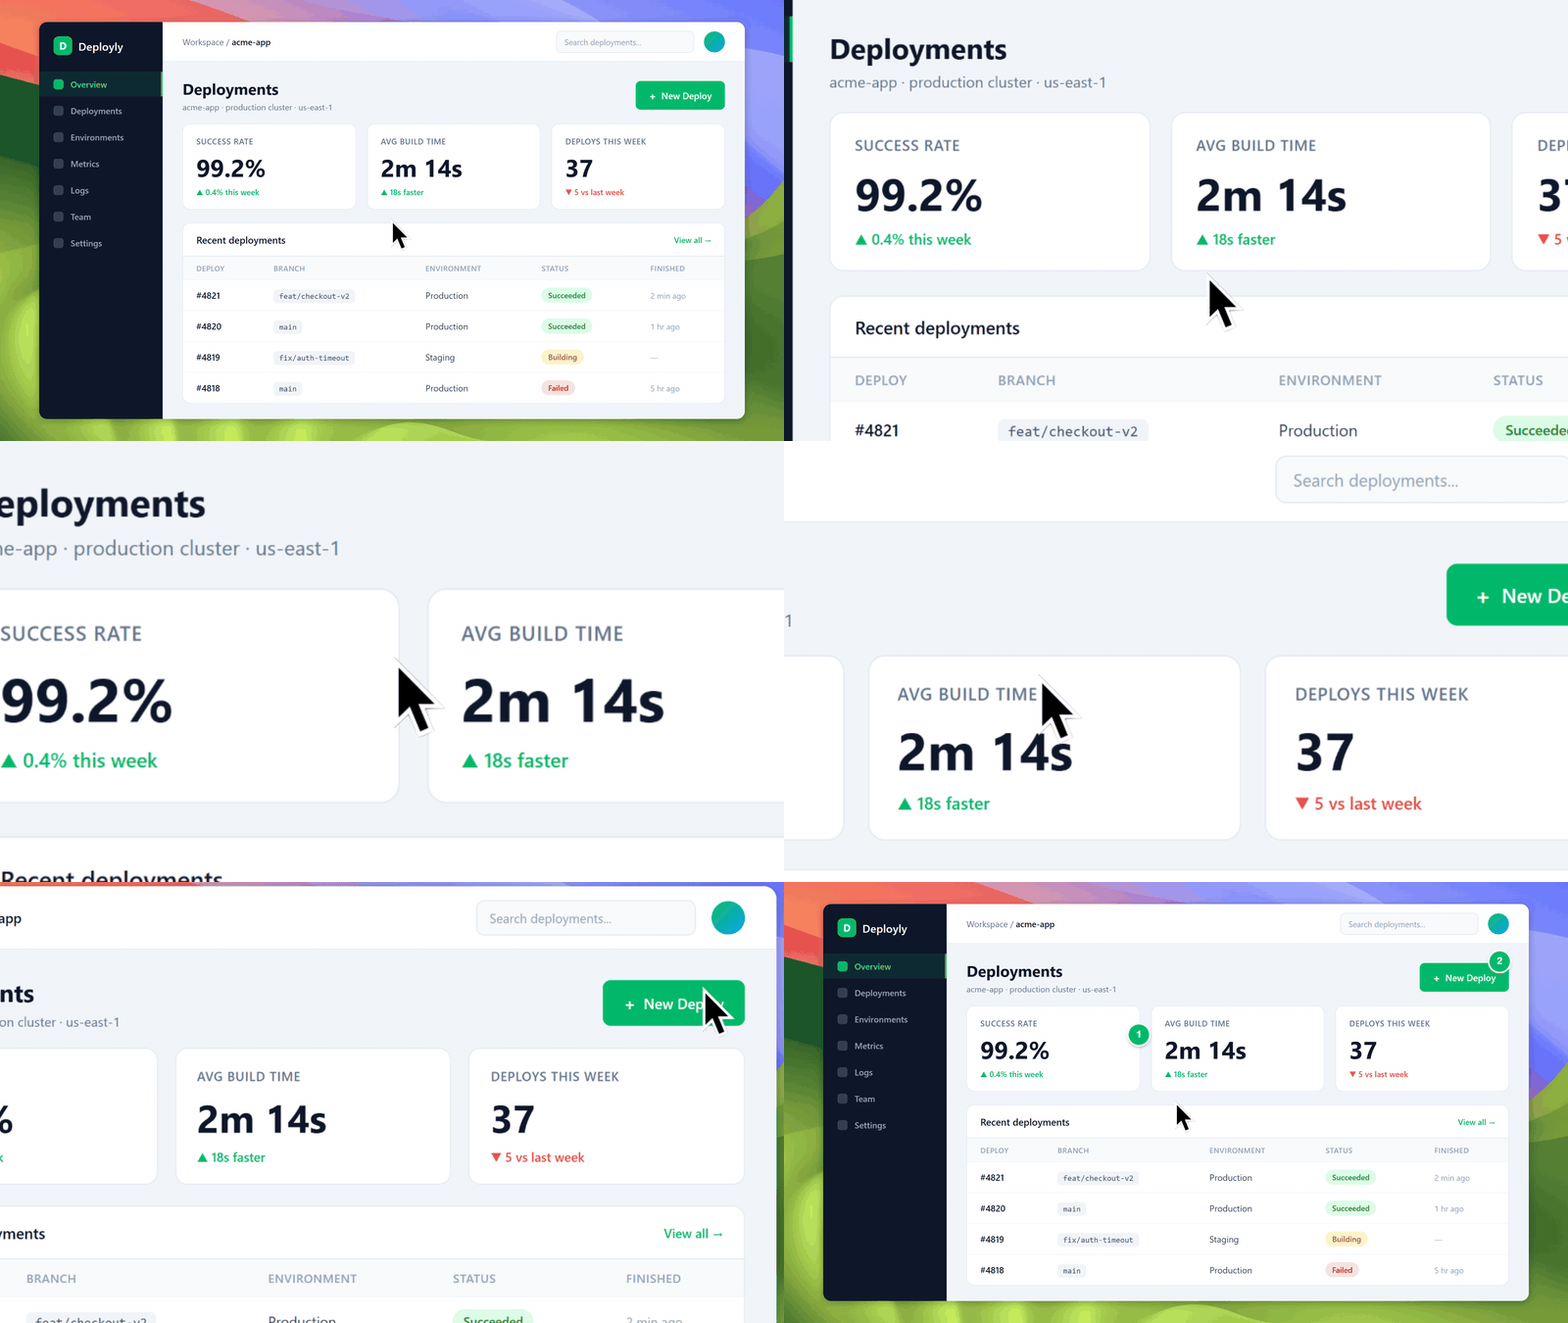
A 6.5-second, 800 px wide, 1.8 MB demo GIF with two zoom points.
Step 4 — Check the File Size and Shrink It if Needed
If the export lands above your budget, adjust the knobs in this order:
- Trim duration. Every second at 10 fps is ten frames; cutting two dead seconds at the start usually saves more than any other change.
- Crop dead margins. Letterbox bars and empty browser chrome get encoded into every single frame. Crop to the application window.
- Drop the width one step. Going from 480 px to 320 px cuts the pixel count by more than half — and stays readable if your frames are already zoomed in.
- Lower the frame rate. 10 → 8 fps is barely visible on mostly static UI.
- Switch quality tier last. Standard shaves bytes, but banding starts to show on gradients.
Flat UI screens compress beautifully; photographs and dithered gradients do not. If your demo includes photo content, zoom in so the photo fills less of the frame, or the file will fight you the whole way.
Step 5 — Host It and Embed It in Your README
Two hosting options, one clear winner:
- Commit the GIF to the repository (in an assets or docs folder, not the root). It renders everywhere the README renders, survives external hosts dying, and travels with forks and clones. Recommended.
- GitHub user-attachments. Drag the GIF into any issue or pull-request draft, copy the generated URL, and reference it in the README. Convenient, but the asset belongs to your account rather than the repo and is really meant for conversations — treat it as a stopgap.
The embed itself is one line of Markdown: an exclamation mark, then alt text in square brackets, then the file path or URL in parentheses. Write real alt text — screen readers, and registries that strip images, still get the description.
Other Tools That Export Demo GIFs
The workflow above is editor-agnostic. If you already have a capture, these are the established options:
- ScreenToGif — Windows, free and open source. Records a screen region and includes a frame-by-frame editor; the deepest cleanup tool on this list.
- Kap — macOS, free and open source. Records windows or regions and exports GIF or MP4.
- LICEcap — Windows and macOS, free. A deliberately minimal region recorder that writes GIFs directly; no editing.
- GIPHY Capture — macOS, free. Quick capture with trim and caption stickers.
- vhs — open source, from Charm. You script a sequence of terminal commands and it renders a GIF of them executing; the de-facto standard for CLI demos.
None of these add camera zoom automatically. If your demo needs to show small details — a settings panel, a cell in a table, a terminal prompt — that is exactly what a zoom-aware editor is for, and it is the difference between a GIF people squint at and one they read.
FAQs About Making a Demo GIF for a README
How large can a GIF be on GitHub?
Files up to 50 MB commit silently; between 50 and 100 MB you get a warning; over 100 MB the push is rejected. A README demo under 5 MB never sees any of it.
Should I use a GIF or an MP4?
Use a GIF when the demo is short, silent, and must autoplay everywhere the README is rendered. Use an MP4 when you need audio or more than about 15 seconds — and accept the click-to-play. Many projects ship both: the GIF inline, the video linked next to it. For the video half, our step-by-step demo video guide walks through scripting and recording.
How long should a README demo GIF be?
Five to fifteen seconds, one task. If you cannot trim your demo to that, you are probably demonstrating two products.
Why did my GIF come out so big?
File size scales with duration, width, height, and frame rate. Cut dead frames first, crop the margins, then step down width and frame rate. Noisy content — photos, gradients, dithering — inflates GIFs dramatically; flat UI screens compress best.
Can a GIF have sound?
No. The format has no audio track. If the demo needs narration, embed the silent GIF for the motion and link a narrated video beside it.
Ship the Loop
A README with a tight, zoomed, looping demo turns a scanner into a reader before your first heading does. Poindeo runs in the browser, the free plan covers GIF export end to end, and zoom points take the hardest part — legibility — off your hands. Start from the screen recorder with auto zoom page and have your first loop ready before your coffee cools.